Depth-colored images are images like the one below:
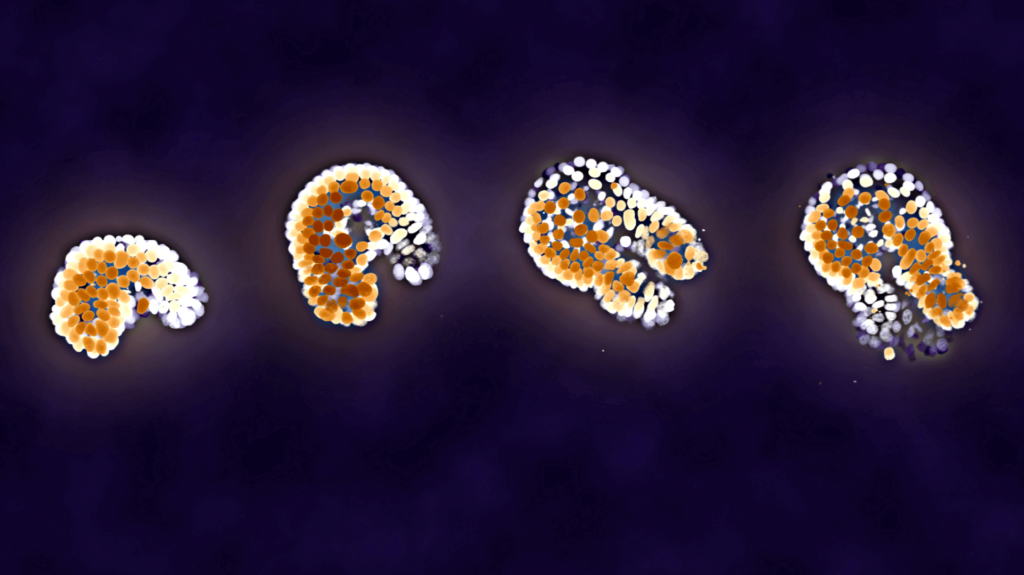
In this example image, fluorescent signal coming close to the viewer is red, and signal futher away becomes yellow and eventually blue. In this tutorial, we will create such an image from a Z-stack image, obtained using confocal microscopy.
If you’re familiar with image editors like Photoshop or Paint.NET, then you know that they work with multiple layers. If you have some red shape in one layer, a purple shape in the second layer and a blue shape in the third, then it will draw them all on top of each other:
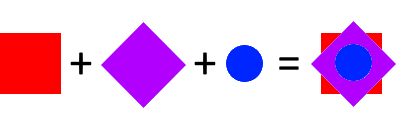
We are going to do the same with fluorescence images: convert each layer in a Z-stack to a certain color, and then draw them on top of each other.
Preparing your Python environment
To run the code, you’ll need the Pillow package (for stacking the layers using a technique known as alpha composition), the matplotlib package (for its colormaps) and the tifffile package (for loading 3D TIFF files).
You can create a new conda environment containing these packages using the following command:
conda create --name colortest --channel conda-forge matplotlib-base tifffile pillow
Then don’t forget to activate this environment using conda acitvate colortest.
Downloading an example data
We are going to use the intestinal organoid dataset from the example data, so please download that and extract it somewhere.
Running the code
First, we will define the function that will create a depth-colored image, given a 3D numpy image array (Z-Y-X-indexed).
from PIL import Image
import numpy
import matplotlib.cm

color_map = matplotlib.cm.get_cmap("Spectral")

def _convert_image(image):
    background_image = numpy.zeros((image.shape[1], image.shape[2], 4), dtype=numpy.uint8)
    background_image[:, :, 3] = 255  # Make background opague by setting the alpha channel to 255
    color_image_pil = Image.fromarray(background_image)

    max_z = image.shape[0] - 1
    max_intensity = image.max()

    slice_buffer = numpy.zeros((image.shape[1], image.shape[2], 4), dtype=numpy.float32)  # 2D RGBA
    slice_buffer_uint8 = numpy.zeros((image.shape[1], image.shape[2], 4), dtype=numpy.uint8)  # 2D RGBA

    for z in range(max_z, -1, -1):
        image_slice = image[z]

        # Make the temporary buffer colored
        color = color_map(z / max_z)
        slice_buffer[:, :, 0] = color[0] * 255
        slice_buffer[:, :, 1] = color[1] * 255
        slice_buffer[:, :, 2] = color[2] * 255

        # Set the alpha layer to the image slice
        slice_buffer[:, :, 3] = image_slice
        slice_buffer[:, :, 3] /= max_intensity
        slice_buffer[:, :, 3] **= 2  # To suppress noise
        slice_buffer[:, :, 3] *= 255

        # Add to existing image
        slice_buffer_uint8[...] = slice_buffer
        slice_buffer_pil = Image.fromarray(slice_buffer_uint8)
        if color_image_pil is None:
            color_image_pil = slice_buffer_pil
        else:
            color_image_pil = Image.alpha_composite(color_image_pil, slice_buffer_pil)

    color_image = numpy.asarray(color_image_pil, dtype=numpy.float32)
    color_image /= 255  # Scale to 0-1
    return color_image
On its own, this code will not do anything. We will use it as follows:
image_3d = tifffile.imread(r"path\to\Dataset intestinal organoid proliferation/Microscopy images/nd799xy08/nd799xy08t099c1.tif")
image_depth_colored = _convert_image(image_3d)
matplotlib.image.imsave("depth_colored_image.png", image_depth_colored)
Place this code after the other code, and change the path on line 1. If you run it, then you’ll get the following image:

You can of course put this code in a loop, and put all the output images in some folder. Then you can load all the images in ImageJ, and save them as a movie (by default ImageJ can save to AVI).